Showing posts with label XCode 4. Show all posts

Tuesday, June 14, 2011

How to create ad-hoc distribution file on XCode 4 ?

I found these 2 articles of good value. Enjoy them.
Basically they tell you how you can create .ipa file which is result of your ad hoc distribution build. These .ipa files you can drag and drop into your iTunes and sync.


http://diaryofacodemonkey.ruprect.com/2011/03/18/ad-hoc-app-distribution-with-xcode-4/


and


http://www.musicalgeometry.com/?p=1237


If you want to know how you want to create  a distribution build to submit to App Store then REFER To THIS POST of mine.

Wednesday, April 27, 2011

How to check memory leaks in XCode 4 ?

You need to go to Product>Profile on the top menu of XCode 4 as shown in screenshot below.


Then you will see following window, you can just choose Leaks and Press Profile button, it will start the Instrument and start tracking leaks and allocation.


As soon as you press Profile, it will start Instrument and the simulator/device(You can change in the settings of the Instrument whether you want to run it on simulator or device) will start running the app.
You scroll through various pages on your app. While doing so,  if you view the red line in Leaks windows of Instrument as shown below then you have memory leak detected ! You can move the dotted line with slider to find out how many bytes leaked at what time in a small yellow pop up.


When you double click the red thick line of memory leak as shown  above , in the lower portion of the Instrument you will be able to see all the leaks and related info. If I want to find detailed info about a particular leak,  in this tutorial as you can see the blue highlighted line of leak, I am going to inspect about that leak hence I will just click the arrow which comes up in its address field.


This will refresh the window and tell you the details with  Responsible Caller column in the end of the table , it gives the specific method  name where the leaks has occurred. If you double click the row, it will open that corresponding .m file where that method has been implemented.


Now you can see that the line is highlighted where the leak has occurred in the method of a .m file in the project.


 Hope this helps to someone new in fixing memory leaks !

Thursday, March 24, 2011

How to add frameworks to your project in XCode 4 ?

See yourself in screenshot below.
Press the + button in Link Binary with Libraries section: It will open the list of available frameworks from where you can choose.

How to create app on App Store ?

1.Log in with your itunes connect account @ https://itunesconnect.apple.com/WebObjects/iTunesConnect.woa

You should be making the app ready for uploading binary on App Store before you even begin building the distribution version of your application, its important in case of XCode 4. (that's the way I could figure out though :) )

2. You will see following screen as given below. You click on Manage Your Applications


3. You will see Add New App on this screen as shown below. Click on it.


4. You will see following screen where you will need to enter your app's name, fill in SKU number.
Fill in bundle ID (see post HERE for how to create Bundle ID for your app to be uploaded.)


5. You will get following warning , dont worry about it.Make sure you have selected the correct Bundle ID. Be sure and press Continue.


6. Fill in Availability date and price tier and other stuff  as shown below in screenshot (which I am sure you have filled before as well). Press Continue.


7. Then you have to fill all the meta data (data shown below  is an example, you will have to fill metadata of your own app).


8. Next screen would be as shown below. And it says for status: Prepare to upload.


Next you will have to press view details button and you will see a new screen with button prepare to upload button which you can press and it will be ready to upload binary finally !


9. You will see following screen. Notice button on right side of screen which says Ready to upload Binary, just press that button.


10. Next you will be asked to fill the encryption complaince. Fill it according to your app.


11. Then you will see following screen, just press continue.


12. Then you will see following screen with status of your app to Waiting for Upload.


Now we can move on to creating XCode distribution build to upload our binary.

Follow my next post "How to create distribution build with XCode 4  ?"

How to create distribution build with XCode 4 ?

1. Open XCode with your code of the application which you want to upload.

2. Select your project and under configuration press + and duplicate Release Configuration.


3.  Rename the release duplicate to Distribution
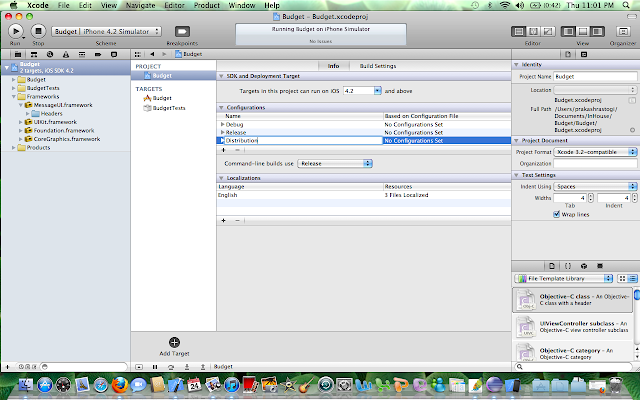


 4. Set the command-line builds to Distribution from the drop down menu as shown below.


5. In the Build Setting: You need to choose the provisioning.

See HERE for how to create provisioning file  for distribution


6.  You can set the product name of your app as shown below.(The name with which your app will appear on App Store).


7. We need to open the info.plist file and change the bundle name to the bundle ID string to com.reetu.youbudget  which we created on App Store for this application.
See here how to create bundle ID ?


8.  Now you select the target of the application in the XCode. you will be able to see updated Bundle ID in the identifier field as com.reetu.youbudget  in the Summary Tab as shown below.


9.  In the Build Settings Tab, you can change the product name to correct product name.


10. Now click on the dropdown present to the left of Breakpoints to see the pop up as shown below. There you select Edit Scheme.


11.  This will open a new window as shown below, you need to select the archive on the left most menu. Change destination to iOS device.


12.  You need to change build configuration on that same window to Distribution as shown below.


13. Then you have to choose Product > Archive.


14. You will be asked to allow the code signing to happen, you press Allow.


15. After you have the archived successfully, your organizer will open as following screenshot. If it does not open, then you can open it from top menu of XCode Window > Organizer.


16. Next you validate by validate button on the screen above, then you will asked to put in your itunes connect account info.You may actually get an error while authentication if no application is available on App Store with status ready to upload binary. Hence you need to create the app on App Store first. You can check the link of the post given in  next point which describes it.

17.  Then you will have following window appear, where you have your application to be selected from the drop down menu (this will appear only if you have already created your application on App  Store as mentioned by me in THIS POST "How to create app on App Store" )

After application is selected, you need to choose the correct provisioning file from the drop down menu.
Note: It may appear that it is already selected but still you need to drop down and check if its the right one.


18. Then you Press Next. then it asks you the sign the code with the valid key as shown in the screenshot below. Just press Allow.


19. You will see following screen that validation has been successful. Finish it by pressing Finish Button.

20. Now you press the button Submit to submit it on App Store (it is present 1 button below the validate button). Make sure you have right app selected in Application and right Identity( provisioning file ) before your press Submit button.


21. You will see following screen for abour 4-5 mins while its uploading your app on App Store.


22. After it is successfully submitted, you will see following screen. Then just press Finish.


23. Yeppie !! You have submitted the app on App Store !! If you  login into your iTunes Connect account you will see that status has been changed from  waiting for upload to your upload has been received and soon it changes to Waiting for review automatically.

You can see in the screenshot below , the status appears Waiting for review.


Now. After you submitted with your app, you suddenly want to do one change in the app and hence you want to reject the binary . How to reject the binary ? READ HERE