Thursday, March 22, 2012

How to read through a n-times looped array.

This is logical programming post, nothing to do with the iOS  or Objective C.
Suppose you have an array which is looped n times. and its tree structure looks something like following. Where each node is an array, except the leaf nodes which are strings.


So, lets see nodes which are array A,B,E,G,G,J,K .Leaf nodes which are strings  C,D,F,H,I,L,M,N,O,P.
I hope you get the picture. Basically this is an N-ary tree. Now I am going to tell you how to write a breadth first traversal on this N-ary tree.

NSArray *A= [NSArray arrayWithObjects:[NSArray arrayWithObjects:[NSArray arrayWithObjects:@"M",@"N",nil],@"H",@"I"],@"C",@"D",[NSArray arrayWithObjects:[NSArray arrayWithObjects:@"O",nil],[NSArray arrayWithObjects:@"P",nil],nil],@"F", [NSArray arrayWithObjects:@"L",nil],nil];


You start with A store it in an array say tempArray, read all the children of A.
append all the children to tempArray, now read all those children's children one by one and keep appending.

 Storing data in above given format is not the most optimum way, but this article is not about finding the optimum way to store your data. It is about how to read through the looped array.


   BOOL noLeaves=TRUE;
   int totalChildren=0;
   NSMutableArray *tempArray=[[NSMutableArray alloc]initWithArray:A];
   NSMutableArray *childrenAtNode=[[NSMutableArray alloc]init];
   NSMutableString *childrenAtNodeString=[[NSMutableString alloc]initWithString:@""];

   while (noLeaves)
   {
   int p=0;


   for (int count=0; count<[A count]; count++)
   {

           if([[A objectAtIndex:count] isKindOfClass:[NSString class]])
          {
              totalChildren++;
          }
          else if([[A objectAtIndex:count] isKindOfClass:[NSArray class]])
          {
              [childrenAtNode addObject:[NSNumber numberWithInt:[[A objectAtIndex:count] count]]];

              [tempArray removeObjectAtIndex:0];


              p=1;
               NSArray *childArray=[A objectAtIndex:count];
               for (int child=0; child < [childArray count]; child++)
              {
                   [tempArray addObject:[childArray objectAtIndex:child]];
               }
          }


     }

     A=[[NSArray alloc]initWithArray:tempArray];

     if(p==0)
     noLeaves=FALSE;
     else
     {

          for (int i=0;i<[childrenAtNode count];i++)
          [childrenAtNodeString appendFormat:@"%i,",[[childrenAtNode objectAtIndex:i] intValue]];


          [childrenAtNodeString appendString:@":"];

     }

     [childrenAtNode removeAllObjects];

  }
  NSLog(@"totalChildren=%i",totalChildren);
  NSLog(@"childrenAtNodeString=%@",childrenAtNodeString); //This will print like 6:3,0,0,2,0,1: .... so you can figure out very easily, that level 1 in tree have 6 nodes. first node has 3 children, second node is a leaf node
  NSLog(@"A=%@",A);


How to use ImageEdgeInsets in UIButton ?

If you are unhappy with the location of image on your button, you can place the image as per your choice anywhere in your button bounding rect.

Here is a sample code to create a button, You can create it Interface Builder too.


  UIButton *button=[[UIButton alloc]initWithFrame:a];
  [button addTarget:self action:@selector(ButtonClickedOnFirstNavigationBar:) forControlEvents:UIControlEventTouchUpInside];
  button.titleLabel.font=[UIFont fontWithName:@"Helvetica" size:10];
  [button setTitleColor:[UIColor grayColor] forState:UIControlStateNormal];
  [button setTitleColor:[UIColor whiteColor] forState:UIControlStateSelected];
  [button setTitle:@"Find Report" forState:UIControlStateNormal];
  [button setBackgroundColor:[UIColor clearColor]];
 [button setImage:[UIImage imageNamed:@"MyReport.png"] forState:UIControlStateNormal];
  [button setContentHorizontalAlignment:UIControlContentHorizontalAlignmentLeft];
  [self.view addSubview:button];


Following is what the button looks like. Button Image by default sticks to the left margin.


I want move the image close to the right margin so I use ImageEdgeInsets. Lets add following line:


[button setImageEdgeInsets:UIEdgeInsetsMake(0, CGRectGetWidth(button.frame)-15, 0, 0)];


Now our button looks like following:


UIEdgeInsetsMake is really really simple to implement. First argument tells how much margin you want between image and top bound,
second argument is margin you want on left,
third argument is margin you want on bottom,
fourth argument is margin on right.


Angry Bird Space !!


How to sort an NSArray with integers elements ?

 Its very very simple.


NSMutableArray *heightArray=[[NSMutableArray alloc]init];
for(int i=0; i<10; i++)
{
     float value=(rand()%100.0)/10;
     [heightArray addObject:[NSNumber numberWithFloat:value]];
}
NSArray *sortedArray = [heightArray sortedArrayUsingSelector:@selector(compare:)];
//Lets print the sorted Array
NSLog(@"sortedArray=%@",sortedArray);


For sorting an array which contains  instance of custom class. You can check this old post.


Find size of rect to fit a string?

This has been a popular question of all time. Developers will face it sooner or later. You have a string which you want to display in your UILabel, but you want to keep the size of UILabel dynamic, you don't want to hard code its bounding rectangle because say, your string is dynamic.

NSString *myString=@"This is a dynamic string";// It will probably change after some event happens.


  UIFont *myFont=[UIFont fontWithName:@"Helvetica" size:10];
  CGSize size = [myString sizeWithFont:myFont forWidth:300 lineBreakMode:UILineBreakModeWordWrap];


Create the CGRect with the size calculated above.

  CGRect a=CGRectMake(50, 50, size.width, size.height);


Now you can create your label with size received above.


  UILabel *myLabel=[[UILabel alloc]initWithFrame:a];
  myLabel.text=myString;
  myLabel.font=[UIFont fontWithName:@"Helvetica" size:10];

Adding more than 1 item filled with gradient to your UIView ?

In previous article,   we talked about how to fill gradient in a clipped area on your screen. What if you have more than 1 shape to be displayed on your screen. As mentioned previously you need to use CGContextSaveGState(context) and CGContextRestoreGState(context).


Lets add these 2 commands to our code where we created and arc with gradient filled.


   //Add Arc with gradient
   CGContextSaveGState(context);
   CGContextMoveToPoint(context, 100, 100);
   CGContextAddArc(context, 100, 100, radius, 1.04 , 2.09 , 0);
   CGContextClosePath(context);
   CGContextClip(context);


   CGPoint endshine;
   CGPoint startshine;
   startshine = CGPointMake(100 + radius * cosf( 1.57 ),100+ radius * sinf( 1.57 ));
   endshine = CGPointMake(100,100);
   CGContextDrawLinearGradient(context,gradient , startshine, endshine, kCGGradientDrawsAfterEndLocation);
   CGContextRestoreGState(context);


Lets add a square with gradient. Of course you can change the gradient of your own colors of choice. But for now let it have same gradient colors.Make sure to keep the code bound in CGContextSaveGState(context) and CGContextRestoreGState(context) , so that we can keep adding more shapes to our scene without getting it clipped.

   //Add Square WITH GRADIENT
   CGContextSaveGState(context);
   CGContextAddRect(context, CGRectMake(5, 5, 50, 50));
   CGContextClip(context);

   startshine = CGPointMake(5,55);
   endshine = CGPointMake(5,5);
   CGContextDrawLinearGradient(context,gradient , startshine, endshine, kCGGradientDrawsAfterEndLocation);
   CGContextRestoreGState(context);


Now lets add finally a circle which has same gradient colors to our scene.

   //Add Circle WITH GRADIENT
   CGContextSaveGState(context);
   CGContextAddEllipseInRect(context, CGRectMake(105, 5, 70, 70));
   CGContextClip(context);

   CGPoint startPoint = CGPointMake(140, 40);
   CGPoint endPoint = CGPointMake(140, 40);
   CGContextDrawRadialGradient(context, gradient, startPoint, 5,endPoint , 35, kCGGradientDrawsBeforeStartLocation);
   CGContextRestoreGState(context);


Now on running the code, our scene will look like following:


Apply Gradient to a clipped area in 5 steps.

In one of our previous articles, we talked about how to fill your entire screen with gradient. In this article,We explain how to fill an arc area in the circle with the gradient in 5 steps.

First you need to create gradient of your color choice


   CGColorSpaceRef RGBColorspace = CGColorSpaceCreateDeviceRGB();

   CGFloat BGLocations3[2] = { 0.0, 1.0 };
   CGFloat BgComponents3[12] = {0.290,0.07,0.552 , 1.0, // Start color
0.696,0.554,0.8 , 1.0}; // End color
   CGGradientRef gradient = CGGradientCreateWithColorComponents(RGBColorspace, BgComponents3, BGLocations3, 2);


Now you  create your context and make sure anti-alias is  ON.


   float radius=100.0;

   CGContextRef context = UIGraphicsGetCurrentContext();
   CGContextSetAllowsAntialiasing(context, true);
   CGContextSetShouldAntialias(context, true);


Now create your arc


   CGContextMoveToPoint(context, 100, 100);
   CGContextAddArc(context, 100, 100, radius, 1.04 , 2.09 , 0); //angles are in radians 1.04 = 60 deg , 2.09 = 120 deg
   CGContextClosePath(context);


Clip your path


   CGContextClip(context);


Now draw your gradient.


   CGPoint endRadius;
   CGPoint startshine;
   startshine = CGPointMake(100 + radius * cosf(1.57),100+ radius * sinf(1.57));
   endRadius =CGPointMake(100,100);
   CGContextDrawLinearGradient(context,gradient , startshine, endRadius, kCGGradientDrawsAfterEndLocation);


So today you learnt how to apply gradient to an area of entire screen. Now I want make more figure on same screen. You will have to use now CGContextSaveGState(context) and CGContextRestoreGState(context). We will see in  next article  about how to use them.


Complete Code:

 - (void)drawRect:(CGRect)rect
 {

   CGColorSpaceRef RGBColorspace = CGColorSpaceCreateDeviceRGB();
   CGFloat BGLocations3[2] = { 0.0, 1.0 };
   CGFloat BgComponents3[12] = {0.290 , 0.07 , 0.552 , 1.0, // Start color
0.696 , 0.554 , 0.8 , 1.0}; // End color
   CGGradientRef gradient = CGGradientCreateWithColorComponents(RGBColorspace, BgComponents3, BGLocations3, 2);


   float radius=100.0;

   CGContextRef context = UIGraphicsGetCurrentContext();
   CGContextSetAllowsAntialiasing(context, true);
   CGContextSetShouldAntialias(context, true);


   CGContextMoveToPoint(context, 100, 100);
   CGContextAddArc(context, 100, 100, radius,1.04,2.09, 0);
   CGContextClosePath(context);

   CGContextClip(context);


   CGPoint endRadius;
   CGPoint startshine;
   startshine = CGPointMake(100 + radius * cosf(1.57),100+ radius * sinf(1.57));
   endRadius =CGPointMake(100,100);
   CGContextDrawLinearGradient(context,gradient , startshine, endRadius, kCGGradientDrawsAfterEndLocation);


 }

Here is what it will look like:


2 Enums having common values ?

As we mentioned in our previous post, there is this unique problems in enums you may come across sometime that what if 2 enums ended up having some values same, your code will show ERROR, how to solve this ? I will give an example:
Suppose you have an enum

typedef enum
{
        Red ,
        Green,
        Yellow
}BarColors;


typedef enum
{
        Voilet,
        Indigo,
        Blue,
        Green,
        Yellow,
        Orange,
        Red
}RainbowColors;


Now you can see that Red, Green and Yellow are same in both enums. You will get error if you have both enums in your same code. How to deal with it, conventionally you can add a prefix to each enum value like following:

typedef enum
{
        b_Red ,
        b_Green,
        b_Yellow
}BarColors;


typedef enum
{
        r_Voilet,
        r_Indigo,
        r_Blue,
        r_Green,
        r_Yellow,
        r_Orange,
        r_Red
}RainbowColors;


This will solve the error.

How to use enum in Objective C ?

Ok so this post is about how to use enum. Enumerations are very useful when it creating a type which will take only predefined values. In order to avoid having to use the enum keyword everywhere, a typedef can be created:


typedef enum
{
    mLineType = 10,
    mBarType,
    mStackedType
}ChartType;


 Now you know how to create enum, how do you use it though ? You create a class say MyChart and have ChartType as one of the member variable.


 @interface MyChart : UIView
 {

    NSArray *valueArray;
    ChartType type;


 @private
    int levels_;
    float yOffset;
    float xOffset;
 }

 @property(nonatomic,retain)NSArray *valueArray;
 @property(nonatomic,assign) ChartType type;

 -(void)drawGraph;
 @end


Now you have create an instance of MyChart and define its type as following.


 MyChart *chart =[[MyChart alloc]initWithFrame:a];
 chart.type=mLineType;
 [chart drawGraph];
 [self.view addSubview:chart];


Now there is this unique problems in enums you may come across sometime that what if 2 enums ended up having some values same, your code will show ERROR, how to solve this ? See you in NEXT ARTICLE.


Thursday, March 15, 2012

Optional Delegate Methods


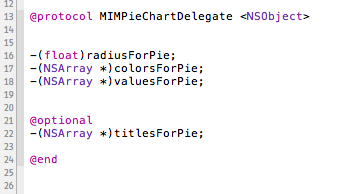
So you created a delegate class and you defined some delegate methods in it. Now when you run your code.You may get following warning as a result of not implementing all the delegate methods in your implementation file. This article can help.  

 WARNING: iPhone class * does not fully implement the * protocol.

 The solution is to use @optional as shown below.


Ok one more thing when you call optional delegate method in your code ,make sure it has been implemented by user.


  if([delegate respondsToSelector:@selector(colorsForPie)])
  {

        colorsArray_=[delegate colorsForPie];

  }


Infinite loop due to loadView.

To prevent an infinite loop from happening in viewDidLoad, you should override loadView method in your .m

With following piece of code:

- (void)loadView
{
      [super loadView];

}

By overriding, the control will not execute viewDidLoad multiple times.

Wednesday, March 14, 2012

Watch "the new iPad" details video: MUST !


All copyrights belong to Apple Inc. for this video.

How and when to use NSAssert ?

If you want to write a code

1. Which is easier to debug(for you as well as others :P)
2. is a standard piece of code

Don't forget to include NSAssert in your code.

Here is an example of how you can use it:

//Assertion Code  
NSAssert((count <= 4)&&(count >= 3),@"colorString components count should be in range(3,5)");


Whenever the condition given above becomes false, it raises NSInternalInconsistencyException along with description message.
Result in Console:

*** Assertion failure in +[ColorClass colorWithComponent:], /Users/mac/Desktop/ChartLib/Lib Files/Colors/ColorClass.m:66
*** Terminating app due to uncaught exception 'NSInternalInconsistencyException', reason: 'colorString components count should be in range(3,5)'


Note:Please make sure that your XCode should be running in debug mode.

Tuesday, March 13, 2012

The new iPad

Ok here is the YOUTUBE video from CNET guys explaining some of the new features in the newly launched iPad HD. I guess the main highlight is the HD which is spectacularly better than macs. And inbuilt photo editing iPhoto software because Camera is now 5 megapx. (just 5 ! Come on guys, we need some better cameras in our Apple products !)


Monday, March 12, 2012

How to make text shrink in UILabel ?


myLabel.adjustsFontSizeToFitWidth = YES;
myLabel.minimumFontSize = 10.0; //You can set to anything like 5.0 or 8.0


If you created UILabel and autoresized programmatically, you might need this for resizing label's text accordingly.

DashCode for XCode 4.3

With the downloading and installation of XCode 4.3 if you deleted the XCode versions  < 4.3
You probably ended up deleting DashCode and others.. You will have to intall DashCode separately after downloading it from Apple's  Dev Center.

Here is the link, you can log in and download:


https://developer.apple.com/downloads/index.action

Tuesday, March 6, 2012

Insertion of rows in UITableView

Ok, In previous post, I gave a sample code of how to delete rows from UITableView using


- (void)deleteRowsAtIndexPaths:(NSArray *)indexPaths withRowAnimation:(UITableViewRowAnimation)animation;


Now in insertion everything is basically same, you have to following same steps,
1. Get the array of indexPath at which you want to insert your cells.
2. Update your dataArray (Insert the relevant items in dataArray at respective indices)
3. Insertion code block

[myTableView beginUpdates];
[myTableView insertRowsAtIndexPaths:array withRowAnimation:UITableViewRowAnimationAutomatic];
[myTableView endUpdates];

Deletion of Rows from UITableView

Ok, In one of my previous posts, I posted a code which lets you expand and shrink the row but it wasn't done using

- (void)insertRowsAtIndexPaths:(NSArray *)indexPaths withRowAnimation:(UITableViewRowAnimation)animation;
- (void)deleteRowsAtIndexPaths:(NSArray *)indexPaths withRowAnimation:(UITableViewRowAnimation)animation;

Interesting thing about that code is that it doesn't crash , you run it on any version but down point is that it doesn't involve any deletion/insertion animation. You can find that post HERE.

Now I am writing this post to give an insight into how to delete/insert the cells from UITableView. For Deletion, you can get a sample code HERE

What this code does ? Click on any row, it deletes all the rows below the clicked row. You can do it iteratively.


Step 1. Get an array of all those indexPaths which you are going to delete.

  NSMutableArray *array=[[NSMutableArray alloc]init];

  int rowCountInSection=[dataArray count];
  for (int s=start+1; s < start+1+size; s++) {


   NSIndexPath *indexPath = [NSIndexPath indexPathForRow:s inSection:section];
   [array addObject:indexPath];

   }


Step 2. Update your array by deleting items at those index

int k=(rowCountTotal-[indexPath row]-1);
while (k>0)
{
      [dataArray removeLastObject];
      k--;
}


Step 3.Implement deleteRows block code

[tableView beginUpdates];
[tableView deleteRowsAtIndexPaths:array withRowAnimation:UITableViewRowAnimationAutomatic];
[tableView endUpdates];


Exception Handling in Objective C

So this is a brief code snippet explaining how to use the try catch to do exception handling


   @try
   {
      //Code on which you want to put the check
   }

   @catch (NSException *exception)
   {

      //This finds out which kind of exception it is.
      NSLog(@"main: Caught %@: %@", [exception name], [exception reason]);

   }


   @finally
   {
      //This piece of code executes no matter whether an exception occured or not.

   }


Monday, March 5, 2012

How to define private methods in Objective C ?

Ok, I was checking my backlog emails and I found out an interesting question asked by a user:

How to define private methods in Objective C ?

Now different people do it differently, but one the most popular and easiest route is following:
You have a class MyClass, So you want to define a private method say updateText:(NSString *)value,
Here is how you do it.


#import "MyClass.h"

@interface MyClass() 
-(void)updateText:(NSString *)value;
@end


@implementation MyClass
.
.
-(void)someMethod
{

    [self updateText:@"Reetu"];
}
.
.
.
-(void)updateText:(NSString *)value
{
     myLabel.text=value;

.
@end


Thursday, March 1, 2012

Tips for deep copy of NSMutableArray

Ok, So if you want to create a deep copy of NSMutableArray which contains items of custom class, you can refer to my old previous post HERE.

But here is the thing if your NSMutableArray contains the non custom class contains like NS(Mutable)Dictionary, you WONT be able to create deep copy by simple doing:


NSMutableArray *a= [[NSMutableArray alloc]initWithArray:b];


Rather,  you can do following trick:

NSMutableArray *a = [NSKeyedUnarchiver unarchiveObjectWithData:[NSKeyedArchiver archivedDataWithRootObject:b]];

For simple copy of array, you can read POST HERE.