Wednesday, December 12, 2012

Textfield on cocos2d Mac

Surprisingly adding a textfield in cocos2d Mac isn't as simple as in cocos2d iOS. There are various suggestions by other coders on how to do this.

This sample code tells you one of the several ways to deal with the textfield in cocos2d Mac.
HERE is the download link.


In this sample code, I have created an external window which opens up when the user hits the textfield.
Here is the UserInterface of nib file. (TextFieldView.xib).


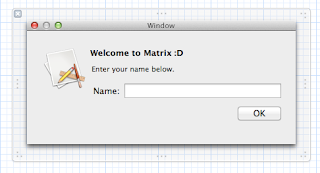
We have following connections on this window.


When I run the app, my window looks like following with textfield which is actually a touch responsive CCMenuItemImage and on top of it sits a CCLabelTTF which says Enter UserName. This string"Enter UserName" will be changed to whatever user enters in the Textfield popup.


When I click on the Enter Username with my mouse, it opens the popup with the textfield. Following code is executed to make the window pop up:


 TextfieldProjectAppDelegate* appDelegate = (TextfieldProjectAppDelegate*)[[NSApplication sharedApplication] delegate];


 tView = [[TextFieldView alloc] initWithWindowNibName:@"TextFieldView"];
    
 assert ([appDelegate window]);
 assert ([tView window]);
    
    
 [NSApp beginSheet:[tView window]
       modalForWindow:[appDelegate window]
        modalDelegate:self
       didEndSelector:@selector(usernameSheetDidEnd:returnCode:contextInfo:)
          contextInfo:NULL];


We also need to define a selector which is where the control comes back when the popup is gone, hence we implement the following:


- (void)usernameSheetDidEnd:(NSWindow *)sheet returnCode:(NSInteger)returnCode contextInfo:(void *)contextInfo {
    
    [sheet orderOut:nil];
    

    NSLog(@"name == %@", tView.username);

    //Need to update text on textfield
    CCLabelTTF *userName=(CCLabelTTF*)[self getChildByTag:106];
    userName.string=tView.username;
    
}


When you are done entering the value in textfield popup, just hit the OK button. When you do that following method(implemented in TextFieldView.m ) is executed. This method makes the popup go away. This is the selector method attached with OK button. You can view the connections in the Xib Interface Window in Xcode (already described above).


- (IBAction)usernameEntered:(id)sender {

     username=[nameField stringValue];
    [NSApp endSheet:self.window];
}

Thursday, November 22, 2012

Conversion between CGPoint & NSValue (Mac)


To convert CGPoint to NSValue:

NSValue valueXY = [NSValue valueWithPoint:CGPointMake(X, Y)];


To retrieve CGPoint from NSValue:


CGPoint mPoint=[valueXY pointValue];


Icons for Mac App

This article also covers how to create .icns file which is used as icon for Mac Applications.


First,you need to create a folder with .iconset as suffix.
This folder will have following items with the dimensions mentioned and named as per screenshot.


  • icon_16x16.png
  • icon_16x16@2x.png
  • icon_32x32.png
  • icon_32x32@2x.png
  • icon_128x128.png
  • icon_128x128@2x.png
  • icon_256x256.png
  • icon_256x256@2x.png
  • icon_512x512.png
  • icon_512x512@2x.png


You go into the directory where you saved icon.iconset folder and then  run following command on Terminal to create icns file.

> iconutil -c icns icon.iconset/

This will give you a single file as output named icon.icns in the same parent directory as icon.iconset, Add this file to resources of your application. Now in your project, you need to update the Icon name in Info.plist like in screenshot here.


Note: Apple documents say that you can add icon.iconset folder itself to your app's resources and Xcode 4.4 automatically creates .icns file for you. It also notes that "Don’t use Icon Composer—it can’t create high-resolution icns files."  . HERE IS THE LINK


Tuesday, November 20, 2012

Cocos2d For Mac

   Create a folder say(Cocos2DGame) where you want to download a copy of   Cocos2d:
   On your Terminal,
> git clone git://github.com/cocos2d/cocos2d-iphone.git

After this command a copy of Cocos2d will exist in Cocos2DGame folder. You need to step into Cocos2DGame folder by doing 
>cd Cocos2DGame
>git checkout develop

You need to install the cocos2d Mac Template in XCode
>sudo ./install-templates.sh

Now when you start a new project in Xcode, you will see the installed Cocos2d for Mac .


Note: You need to install git on your Mac Machine before you can run those git commands given above.

Download and Install dmg
http://code.google.com/p/git-osx-installer/downloads/list


Tuesday, August 14, 2012

How to use NSScanner on NSString.

This is quiet useful in terms of parsing a simple static webpage, also pick certain kind of words from the NSString.

Lets say we have following snippet from a html file.


NSString *htmlString=


< div id="topLeft" class="news" style="padding-top:3px"
onMouseOver="style.color='white';style.backgroundColor='#F0ABFF'" onMouseOut="style.color='black';style.backgroundColor='#000000'"><style="text-decoration:none;color:black" onMouseOver="style.color='white'" onMouseOut="style.color='black'"href="reetu/test/news.htm" target="_blank">Latest News</a>


Now I want to extract the url, text and div id from this html file snippet. Following code will give you that.


     NSScanner *rScanner = [NSScanner scannerWithString:string];
     NSString *divID=@"";
    [rScanner scanString:@"<div id=\"" intoString:NULL];
    [rScanner scanUpToString:@"class=\"news\"" intoString:&courseID];

     divID=[divID stringByReplacingOccurrencesOfString:@" " withString:@""];
     divID=[divID stringByReplacingOccurrencesOfString:@"\"" withString:@""]; 
     divID=[divID stringByReplacingOccurrencesOfString:@"<divid=" withString:@""]; 
     NSLog(@"divID=%@",divID);           

/*Instead of above 3 lines you could also do [rScanner scanUpToString: instead of scanString:
    

    NSString *rURL=@"";
    [rScanner scanUpToString:@"href=\"" intoString:NULL];
    [rScanner scanUpToString:@">" intoString:&rURL];
     rURL=[rURL stringByReplacingOccurrencesOfString:@"href=\"" withString:@""];
     rURL=[rURL stringByReplacingOccurrencesOfString:@"target=\"_blank\"" withString:@""];
     rURL=[rURL stringByReplacingOccurrencesOfString:@"\" " withString:@""];
     NSLog(@"rURL=%@",rURL);


   NSString *rName=@"";
   [rScanner scanUpToString:@"</a>" intoString:&rName];
    rName=[courseName stringByReplacingOccurrencesOfString:@">" withString:@""];
    NSLog(@"rName=%@",rName);


It will print following results:


divID=topLeft
rURL=reetu/test/news.htm
rName=Latest News


Read More: https://developer.apple.com/library/ios/#documentation/Cocoa/Conceptual/Strings/Articles/Scanners.html


Wednesday, August 1, 2012

Tips: How to find if NSDictionary has a key.


if ([[myDiction allKeys] containsObject:@"myKey"])
    NSLog(@"It contains myKey");


Tuesday, July 31, 2012

How to use NSAttributedString in iOS 6


infoString=@"This is an example of Attributed String";

NSMutableAttributedString *attString=[[NSMutableAttributedString alloc] initWithString:infoString];
NSInteger _stringLength=[infoString length];

UIColor *_black=[UIColor blackColor];
UIFont *font=[UIFont fontWithName:@"Helvetica-Bold" size:30.0f];
[attString addAttribute:NSFontAttributeName value:font range:NSMakeRange(0, _stringLength)];
[attString addAttribute:NSForegroundColorAttributeName value:_black range:NSMakeRange(0, _stringLength)];


UIColor *_red=[UIColor redColor];
UIFont *font=[UIFont fontWithName:@"Helvetica-Bold" size:72.0f];
[attString addAttribute:NSFontAttributeName value:font range:NSMakeRange(0, _stringLength)];
[attString addAttribute:NSStrokeColorAttributeName value:_red range:NSMakeRange(0, _stringLength)];
[attString addAttribute:NSStrokeWidthAttributeName value:[NSNumber numberWithFloat:3.0] range:NSMakeRange(0, _stringLength)];


UIColor *_red=[UIColor redColor];
UIFont *font=[UIFont fontWithName:@"Helvetica-Bold" size:72.0f];
[attString addAttribute:NSFontAttributeName value:font range:NSMakeRange(0, _stringLength)];
[attString addAttribute:NSStrokeColorAttributeName value:_red range:NSMakeRange(0, _stringLength)];
[attString addAttribute:NSStrokeWidthAttributeName value:[NSNumber numberWithFloat:-3.0] range:NSMakeRange(0, _stringLength)];


UIColor *_red=[UIColor redColor];
UIColor *_green=[UIColor greenColor];
UIFont *font=[UIFont fontWithName:@"Helvetica-Bold" size:72.0f];
[attString addAttribute:NSFontAttributeName value:font range:NSMakeRange(0, _stringLength)];
[attString addAttribute:NSForegroundColorAttributeName value:_green range:NSMakeRange(0, _stringLength)];
[attString addAttribute:NSStrokeColorAttributeName value:_red range:NSMakeRange(0, _stringLength)];
[attString addAttribute:NSStrokeWidthAttributeName value:[NSNumber numberWithFloat:-3.0] range:NSMakeRange(0, _stringLength)];


UIColor *_green=[UIColor greenColor];
UIFont *font=[UIFont fontWithName:@"Helvetica-Bold" size:72.0f];

NSShadow *shadowDic=[[NSShadow alloc] init];
[shadowDic setShadowBlurRadius:5.0];
[shadowDic setShadowColor:[UIColor grayColor]];
[shadowDic setShadowOffset:CGSizeMake(0, 3)];
              
[attString addAttribute:NSFontAttributeName value:font range:NSMakeRange(0, _stringLength)];
[attString addAttribute:NSForegroundColorAttributeName value:_green range:NSMakeRange(0, _stringLength)];
[attString addAttribute:NSShadowAttributeName value:shadowDic range:NSMakeRange(0, _stringLength)];


UIColor *_red=[UIColor redColor];
UIFont *font=[UIFont fontWithName:@"Helvetica-Bold" size:72.0f];
[attString addAttribute:NSFontAttributeName value:font range:NSMakeRange(0, _stringLength)];
  [attString addAttribute:NSForegroundColorAttributeName value:_red range:NSMakeRange(0, _stringLength)];              
  [attString addAttribute:NSKernAttributeName value:[NSNumber numberWithInt:5] range:NSMak


UIColor *_red=[UIColor redColor];
UIFont *font=[UIFont fontWithName:@"Helvetica-Bold" size:30.0f];
[attString addAttribute:NSFontAttributeName value:font range:NSMakeRange(0, _stringLength)];
[attString addAttribute:NSForegroundColorAttributeName value:_red range:NSMakeRange(0, _stringLength)];
[attString addAttribute:NSUnderlineStyleAttributeName value:[NSNumber numberWithInt:2] range:NSMakeRange(0, _stringLength)];


UIColor *_blue=[UIColor blueColor];
UIColor *_blueL=[UIColor colorWithRed:0 green:0 blue:0.5 alpha:0.7];
UIFont *font=[UIFont fontWithName:@"Helvetica-Bold" size:30.0f];
                
[attString addAttribute:NSFontAttributeName value:font range:NSMakeRange(0, _stringLength)];
[attString addAttribute:NSForegroundColorAttributeName value:_blue range:NSMakeRange(0, _stringLength)];
[attString addAttribute:NSBackgroundColorAttributeName value:_blueL range:NSMakeRange(0, 20)];


Thursday, July 26, 2012

Tips: Hide scrollbars of UIScrollView


[mScrollView setShowsHorizontalScrollIndicator:NO];
[mScrollView setShowsVerticalScrollIndicator:NO];


Tuesday, July 24, 2012

How to animate a line draw ?

If you want to draw a line pixel by pixel.
You will have to use combination of UIBezierPath, CAShapeLayer, CABasicAnimation. You can download the code here. The piece of code given below  animates a simple line drawn pixel by pixel from point (50.0,0.0to point (120.0600.0).


    UIBezierPath *path = [UIBezierPath bezierPath];
    [path moveToPoint:CGPointMake(50.0,0.0)];
    [path addLineToPoint:CGPointMake(120.0, 600.0)];


    CAShapeLayer *pathLayer = [CAShapeLayer layer];
    pathLayer.frame = self.view.bounds;
    pathLayer.path = path.CGPath;
    pathLayer.strokeColor = [[UIColor redColor] CGColor];
    pathLayer.fillColor = nil;
    pathLayer.lineWidth = 2.0f;
    pathLayer.lineJoin = kCALineJoinBevel;

    [self.view.layer addSublayer:pathLayer];

    CABasicAnimation *pathAnimation = [CABasicAnimation animationWithKeyPath:@"strokeEnd"];
    pathAnimation.duration = 2.0;
    pathAnimation.fromValue = [NSNumber numberWithFloat:0.0f];
    pathAnimation.toValue = [NSNumber numberWithFloat:1.0f];
    [pathLayer addAnimation:pathAnimation forKey:@"strokeEnd"];


Saturday, July 21, 2012

convert NSArray in float[]


        NSArray *c=[NSArray arrayWithObjects:@"1",@"8",@"4",@"2",nil];
        
        NSEnumerator *enumerator;
        float * cArray;
        id obj;
        int index=0;
        
        cArray = (float *) malloc(sizeof(float) * [c count]);
        enumerator = [c objectEnumerator];
        while(obj = [enumerator nextObject])
        {
            cArray[index] = [obj floatValue];
            index++;
        }


Thursday, July 19, 2012

Ad Hoc Build in XCode 4.3+ and XCode 4.5

Things have changed a little bit for ad hoc. This post is for people who may face problem while trying to create adhoc. While trying to install .ipa on device through iTunes, it gives error "iTunes sync failed to start"

Make sure your mobile provisioning for ad-hoc and distribution certificate is installed before we proceed any further. You can go through my old post, it is very detailed, just to refresh things like how to create certificate and other required things.

Note: You can read captions on the image for more clarity.

Add Ad Hoc configuration by duplicating release (You can do that by pressing + sign))


You need to add distribution signing profile for Ad Hoc as well as Release.


Now on top left corner of your XCode screen. Click on project Name like here I click on MIMChartLIb


I get popup like this.Click on Edit Scheme.


Go to Archieve(Highlighted cell on left tableview). On right side,Change Build Configuration to Ad Hoc.Click OK.


Now go to Product > Archive


It will ask you to sign with keys. Click Allow or Always Allow.


After sometime, Organiser window will open displaying Archive. If not, You can open Organiser from Xcode Menu: Window>Organiser.


Clicking on Distribute button on previous screen, opens this. Choose second option here.
Next it asks for Code Signing Identity, Choose your Ad-Hoc distribution profile.


It will ask you to sign with the key Click Allow or Always Allow.


After sometime, it will ask you where to save your .ipa file. Thats it ! You select your location and click Save.