Tuesday, March 29, 2011

Mac OSX Lion

I am going to discuss the features which you can benefit only in this version of Mac OS X i.e. Mac OSX Lion.

1.  Mac App Store



2. Full Screen Apps: Now you can  create enriched user experience by handling the full screen view in a very friendly way using recently added features of NSApplication, NSWindow, and the NSWindowDelegate Protocol.


3.  Aqua Theme with pop over feature like iPad, Overlay Scrollbars just like iPhone, iPad's scrollview's overlaying beautiful translucent scrollbar.Also the best part : Multi-Touch gestures and animations feature can be integrated in your mac apps now !!

4. AV Foundation: Do the changes to your audio/video input in real time !! Think about million possiblities it gives rise to.

5. Versions available just like SVN of your documents on your local machine itself ! How COOL !
Now I know what exact changes were done on what date on my document.

6. Auto Resume . If your restarts, then it will open in same state when it starts again .. Its already there in windows 7. I guess it doesnt excite me that much.

7. Sandboxing of apps on Mac just like iPhone OS.

8. File Accessibility management that simultaneous writes can be handled without error. :)

Thursday, March 24, 2011

How to add frameworks to your project in XCode 4 ?

See yourself in screenshot below.
Press the + button in Link Binary with Libraries section: It will open the list of available frameworks from where you can choose.

How to reject Binary of your app on App Store ?

1. Login into your iTunes Connect Account @ https://itunesconnect.apple.com/WebObjects/iTunesConnect.woa


2. Click Manage your Application. It will take you the list of the applications present on App Store. Select the app you want to reject the binary of. You will need to view the detail of the application. Then you will see following screen as shown below:  On this screen,you need to click on Binary Details.

3. Then you  will see following screen, where you can just press Reject This Binary.
 4. DONE ! Your status of the application will change to Developer Rejected the Binary with red dot !


How to create provisioning file for distribution build of iphone/ipad application?

Log in into your Provisioning Portal. @http://developer.apple.com/ios/manage/overview/index.action

Press New Profile Button. Note that Under Provisioning(Left Side Menu), Distribution Tab is selected.


Select relevant app ID  you made for a specific app which you are going to sign with this provisioning file.


How to create App ID ? (It is also used for creating Bundle ID of the apps)


How to create app on App Store ?

1.Log in with your itunes connect account @ https://itunesconnect.apple.com/WebObjects/iTunesConnect.woa

You should be making the app ready for uploading binary on App Store before you even begin building the distribution version of your application, its important in case of XCode 4. (that's the way I could figure out though :) )

2. You will see following screen as given below. You click on Manage Your Applications


3. You will see Add New App on this screen as shown below. Click on it.


4. You will see following screen where you will need to enter your app's name, fill in SKU number.
Fill in bundle ID (see post HERE for how to create Bundle ID for your app to be uploaded.)


5. You will get following warning , dont worry about it.Make sure you have selected the correct Bundle ID. Be sure and press Continue.


6. Fill in Availability date and price tier and other stuff  as shown below in screenshot (which I am sure you have filled before as well). Press Continue.


7. Then you have to fill all the meta data (data shown below  is an example, you will have to fill metadata of your own app).


8. Next screen would be as shown below. And it says for status: Prepare to upload.


Next you will have to press view details button and you will see a new screen with button prepare to upload button which you can press and it will be ready to upload binary finally !


9. You will see following screen. Notice button on right side of screen which says Ready to upload Binary, just press that button.


10. Next you will be asked to fill the encryption complaince. Fill it according to your app.


11. Then you will see following screen, just press continue.


12. Then you will see following screen with status of your app to Waiting for Upload.


Now we can move on to creating XCode distribution build to upload our binary.

Follow my next post "How to create distribution build with XCode 4  ?"

How to create distribution build with XCode 4 ?

1. Open XCode with your code of the application which you want to upload.

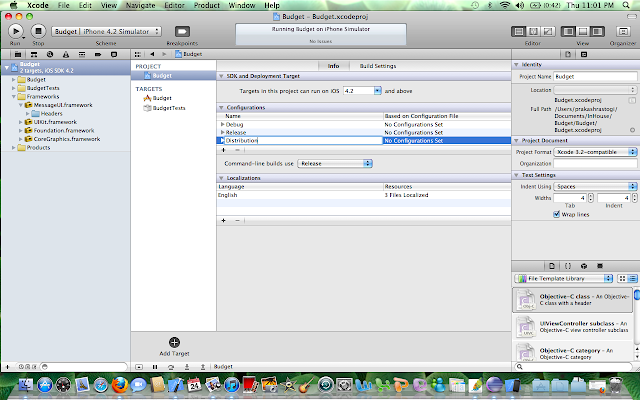
2. Select your project and under configuration press + and duplicate Release Configuration.


3.  Rename the release duplicate to Distribution


 4. Set the command-line builds to Distribution from the drop down menu as shown below.


5. In the Build Setting: You need to choose the provisioning.

See HERE for how to create provisioning file  for distribution


6.  You can set the product name of your app as shown below.(The name with which your app will appear on App Store).


7. We need to open the info.plist file and change the bundle name to the bundle ID string to com.reetu.youbudget  which we created on App Store for this application.
See here how to create bundle ID ?


8.  Now you select the target of the application in the XCode. you will be able to see updated Bundle ID in the identifier field as com.reetu.youbudget  in the Summary Tab as shown below.


9.  In the Build Settings Tab, you can change the product name to correct product name.


10. Now click on the dropdown present to the left of Breakpoints to see the pop up as shown below. There you select Edit Scheme.


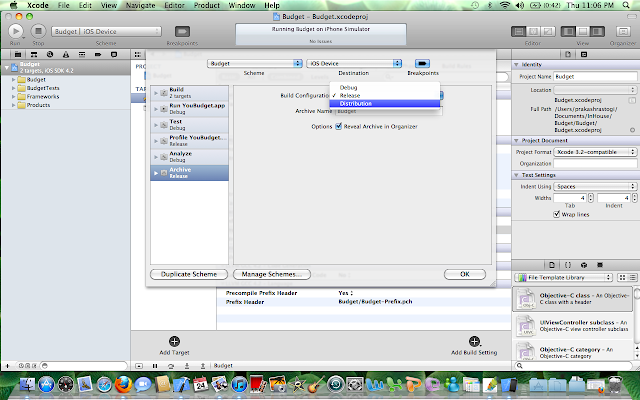
11.  This will open a new window as shown below, you need to select the archive on the left most menu. Change destination to iOS device.


12.  You need to change build configuration on that same window to Distribution as shown below.


13. Then you have to choose Product > Archive.


14. You will be asked to allow the code signing to happen, you press Allow.


15. After you have the archived successfully, your organizer will open as following screenshot. If it does not open, then you can open it from top menu of XCode Window > Organizer.


16. Next you validate by validate button on the screen above, then you will asked to put in your itunes connect account info.You may actually get an error while authentication if no application is available on App Store with status ready to upload binary. Hence you need to create the app on App Store first. You can check the link of the post given in  next point which describes it.

17.  Then you will have following window appear, where you have your application to be selected from the drop down menu (this will appear only if you have already created your application on App  Store as mentioned by me in THIS POST "How to create app on App Store" )

After application is selected, you need to choose the correct provisioning file from the drop down menu.
Note: It may appear that it is already selected but still you need to drop down and check if its the right one.


18. Then you Press Next. then it asks you the sign the code with the valid key as shown in the screenshot below. Just press Allow.


19. You will see following screen that validation has been successful. Finish it by pressing Finish Button.

20. Now you press the button Submit to submit it on App Store (it is present 1 button below the validate button). Make sure you have right app selected in Application and right Identity( provisioning file ) before your press Submit button.


21. You will see following screen for abour 4-5 mins while its uploading your app on App Store.


22. After it is successfully submitted, you will see following screen. Then just press Finish.


23. Yeppie !! You have submitted the app on App Store !! If you  login into your iTunes Connect account you will see that status has been changed from  waiting for upload to your upload has been received and soon it changes to Waiting for review automatically.

You can see in the screenshot below , the status appears Waiting for review.


Now. After you submitted with your app, you suddenly want to do one change in the app and hence you want to reject the binary . How to reject the binary ? READ HERE


How to create bundle ID for your application to be uploaded on App Store ?

Login into your Provisioning Portal @http://developer.apple.com/ios/manage/overview/index.action


Then just follow the screenshots given below.


Saturday, March 19, 2011

How to remove status bar in iOS 3.2 and above apps

You want to remove the status bar(the bar with the signal display and which displays time as well as shown in the screenshot below)


After adding following lines to your app:

[[UIApplication sharedApplication] setStatusBarHidden:YES withAnimation:UIStatusBarAnimationNone];

You will be able to remove the status bar as shown in the screenshot below

How to find out if your Mac OS is 64 bits ?

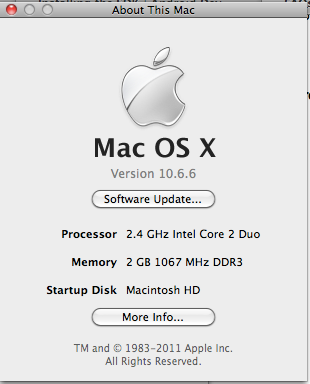
You can go to About this Mac as given in screenshot below


A new window pops up which displays information about your Mac which looks like in screenshot below


If your mac has Mac OS X 10.5 or greater then it is a 64-bit operating system.
Your processor information also lets you know ,if your processor is Intel Core 2 Duo, Intel Xeon, and PowerPC G5 then it is 64-bit processors.

And anyways all the recent Macbooks being shipped are 64 bits.

Wednesday, March 16, 2011

Problems after upgrading to Android SDK 3.0

I recently upgraded to Android SDK 3.0 and I was loads of problem which I am to write about how I went tried to solve them:

After I downloaded the latest SDK installer and installed it , I ran Android SDK and SVD manager. It downloaded and installed all the required packages for 3.0 SDK....


I had to change my SDK path in Windows> Preferences>Android
Changed SDK location from E:\Softwares\android-sdk_r09-windows\android-sdk-windows to E:\Softwares\android-sdk_r10-windows\android-sdk-windows

I had unzipped/installed all my SDK(SDK zipped/installer file was downloaded from android developer website) files in E:\Softwares\android-sdk_r10-windows\android-sdk-windows


While I was trying to change this path, it would keep showing me that my ADT was old, so I had to download the newer 10.0 version of ADT.


How did I upgrade ADT ?
Help> Install New Software

Start typing in input field infront of Work with : https://dl-ssl.google.com/android/eclipse/

If you already have that added from your previous add, then it will display this website and you can double click on it to choose it.

If it doesnt display it, then click Add and Fill in Name as ADT and Location as https://dl-ssl.google.com/android/eclipse/

One more thing:If https://dl-ssl.google.com/android/eclipse/ doesn't work out for you, as in if it gives connection problem then try http://dl-ssl.google.com/android/eclipse/

Ok. Now...In the space below where it says Name and Version, It will display :
Developer Tools.

If you take your mouse over it, then it will display expand buttons which you can click to expand it to see all the elements of Developer Tool. Check all of them because we need to install all of them.

After you have checked them all, just click finish !

It will take about 10 mins to 20 mins to download and install all the Android Developer Tools depending on your network speed.

After its all done. Now you can restart your Eclipse.

I had one more problem after I restarted the Eclipse and created a new Android project, it gace me following error:
Failed to load properties file for project

To solve that I did following:

I created a backup of all projects in my workspace and deleted everything from that folder.
I added following variables in my Environmental Variables:

System Variable>Path
C:\Program Files\Java\jdk1.6.0_23\bin;C:\Users\reetu\.android\avd

The path given above will change according to their location on your system like it depends where you installed your jdk or Android stuff !

Just check if you have these variables already added in there, then you dont need to do it.

How to Access Environmental Variables in Windows 7:
Computer > Properties > Advanced System Settings> Advanced Tab

In the bottom of this Tab , you will be able to see the Environmental Variables.

Ok, after you finished adding them, try running your program..Although it was able to load the property files of my Android project but it gave me a new error :

Debug Certificate expired ...... Unknown Android Packaging Problem

TO solve this: I just deleted following file :

C:\Users\reetu\.android\debug.keystore

then, I just cleaned eclipse by doing following
Project>Clean >> Clean all projects.

Now restart the Eclipse and I was all set ! It was finally all working again like charm !!
Thanks.. :) Hope this helps anyone who reads this post.