1. Open XCode with your code of the application which you want to upload.
2. Select your project and under configuration press + and duplicate Release Configuration.
3. Rename the release duplicate to Distribution
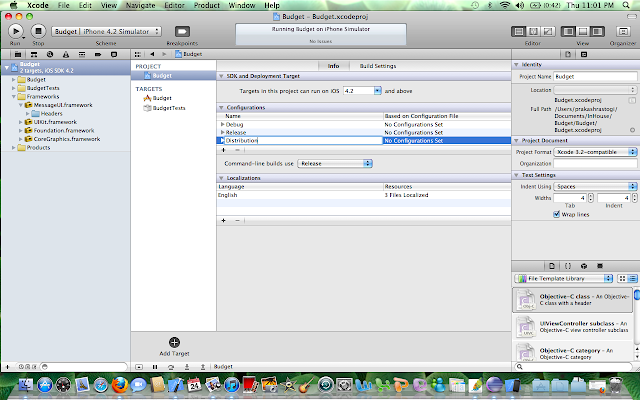
4. Set the command-line builds to Distribution from the drop down menu as shown below.
5. In the Build Setting: You need to choose the provisioning.
See HERE for how to create provisioning file for distribution
6. You can set the product name of your app as shown below.(The name with which your app will appear on App Store).
7. We need to open the info.plist file and change the bundle name to the bundle ID string to com.reetu.youbudget which we created on App Store for this application.
See here how to create bundle ID ?
8. Now you select the target of the application in the XCode. you will be able to see updated Bundle ID in the identifier field as com.reetu.youbudget in the Summary Tab as shown below.
9. In the Build Settings Tab, you can change the product name to correct product name.
10. Now click on the dropdown present to the left of Breakpoints to see the pop up as shown below. There you select Edit Scheme.
11. This will open a new window as shown below, you need to select the archive on the left most menu. Change destination to iOS device.
12. You need to change build configuration on that same window to Distribution as shown below.
13. Then you have to choose Product > Archive.
14. You will be asked to allow the code signing to happen, you press Allow.
15. After you have the archived successfully, your organizer will open as following screenshot. If it does not open, then you can open it from top menu of XCode Window > Organizer.
16. Next you validate by validate button on the screen above, then you will asked to put in your itunes connect account info.You may actually get an error while authentication if no application is available on App Store with status ready to upload binary. Hence you need to create the app on App Store first. You can check the link of the post given in next point which describes it.
17. Then you will have following window appear, where you have your application to be selected from the drop down menu (this will appear only if you have already created your application on App Store as mentioned by me in
THIS POST "How to create app on App Store" )
After application is selected, you need to choose the correct provisioning file from the drop down menu.
Note: It may appear that it is already selected but still you need to drop down and check if its the right one.
18. Then you Press Next. then it asks you the sign the code with the valid key as shown in the screenshot below. Just press Allow.
19. You will see following screen that validation has been successful. Finish it by pressing Finish Button.
20. Now you press the button Submit to submit it on App Store (it is present 1 button below the validate button). Make sure you have right app selected in Application and right Identity( provisioning file ) before your press Submit button.
21. You will see following screen for abour 4-5 mins while its uploading your app on App Store.
22. After it is successfully submitted, you will see following screen. Then just press Finish.
23. Yeppie !! You have submitted the app on App Store !! If you login into your iTunes Connect account you will see that status has been changed from waiting for upload to your upload has been received and soon it changes to Waiting for review automatically.
You can see in the screenshot below , the status appears Waiting for review.
Now. After you submitted with your app, you suddenly want to do one change in the app and hence you want to reject the binary .
How to reject the binary ? READ HERE


